Please be patient while I make this blog pretty and add more content.
Take a look at my Etsy shop to see what items I have for sale:
www.createdbykelli.etsy.com

Showing posts with label tutorial. Show all posts

Thursday, February 28, 2013

Tutorial: $2 Quilted Name Board


This is a super cute way to decorate a wall, and it's so affordable -- like under $2 affordable! The first time I did this, I just used the side of a cardboard box, and it ended up warping because of the Mod Podge. So this time I used foam core (I got this 20"x30" board for about $1.50). Then you need at least 5 sheets of 12"x12" scrapbooking paper. I used 9 so that I could get more patterns on here (and it made enough squares to cover two of these, since I have two daughters). When I do projects like this, I love to use paper from a paper stack because the colors are already perfectly coordinated. These sheets came from a giant 360-sheet stack, which I got for $10 during a sale at JoAnn's. So each sheet cost a little less than 3 cents. 9 sheets comes to 25 cents, and this is enough to cover two boards. Plus, I made my own Mod Podge: combine 1 part white glue and 1 part water in a clean glass jar with a lid; shake until it is evenly combined, and voila! It cost less than a dollar and I had so much leftover.

Cut each patterned sheet into two 6"x6" squares, three 4"x4" squares, and six 2"x2" squares. To cover the 20"x30" board, you need nine 6" squares, thirteen 4" squares, and seventeen 2" squares. I like to distress the edges of each square with an ink pad, because I love the added depth and texture it gives.
I start in the top corner and lay out the squares, making sure not to have two squares of the same pattern touching. Then I take a picture so I can remember where to put them with the Mod Podge.
Starting in the top left corner, I applied a thin layer of homemade Mod Podge to the board -- enough for one square. Then I apply the paper. Smooth across, then down, always working away from the starting corner. This will help avoid wrinkles and air bubbles. I slowly work my way down and across, applying Mod Podge for just a couple squares at a time. It takes a while, but try to be precise. I did end up with a fairly large gap in the top right. If you are like me and cut the squares slightly off, you may need to trim the edges around the board. I also re-distressed the paper along the edges of the board to make it look more finished.
Next, I cut out letters for my daughter's name. I used two sheets (well, one whole sheet and half of two other sheets). One of my weird, useful, but non-marketable talents is being able to write letters backwards. If this is not your forte, you can write the letter on a plain piece of paper, or even print out a font that you like. Cut out the letter, turn it backwards, and trace it on to the white side of the scrapbooking paper. When you cut it out, you will have perfect letters showing the pattern. I also distressed the edges of the letters (I used red for the squares, and white on the letters, to give it more contrast).
Then I wrote out her middle name in cursive (this took two sheets). You can do the same method as before, just using script letters, or print if you want. I inked the edges (in red). To attach the letters, I spread a thin layer of Mod Podge on the under side of the letters, one at a time, and applied it to the board, starting on one side and working to the other to avoid wrinkles. For the cursive, I started applied Mod Podge one letter at a time, being careful not to crease the paper when lifting the remaining letters.
Once everything is dry, use Command Velcro Strips for a no-damage way to hang this from the wall!

Activity: Yarn Outlined Letters

This is a fun, slightly messy way for your child to help you make some cute decor for their room (and get some more exposure to letters). We just used my daughter's first initial, but you could do this for all the letters in their name if you wanted to.

Write letter on craft foam.

Trace letter with white glue and help your child "trace" over the glue with yarn.

The finished product! (It will look better when the glue dries)

Activity: Window Painting

This is another great activity to do with your kids! You can help them practice letters and numbers, or just let them express their artistic side! The best part is, you can keep your child entertained for quite a while, with minimal effort on your part :)

Paint this washable project paint all over a glass door (or a big mirror would be really fun too).

Dip Q-tips in water and use them to "reverse paint" (the paint washes off wherever the Q-tip touches). Lots of fun, and easy clean up (thank goodness!)

Activity: Letter Sculptures

This is a fun, hands-on activity for kids to work with letters. If you want to preserve your child's work (I'm thinking about using it to decorate her room), this air-dry clay is great. Otherwise, any sort of play dough is good.


Give your child a ball of clay.

Help them roll it out so it's long and thin.

Help them create the letter (we did her initial, which is why I think it would be a fun decoration).

And you can make a handprint in some of the extra clay, because that's always fun to do!

Thursday, February 21, 2013

Activity: Number Cookie Monster

This is an incredibly fun way to work on numbers (or letters) with your child! It's quick and easy to make, and they will love feeding their cookie monster the number cookies. Here are the directions (along with a couple ways to use the number cookie monster to teach your child). There's also a bonus activity at the bottom!

Start with an empty Pringles can (or similar container). Measure and cut a piece of plain paper so that it will wrap around and cover the container. Have your child color the paper while you cut out a "mouth" in the container.
Using regular ol' white glue, adhere the paper to the container. I stuck on one edge first, put some glue around the mouth, then wrapped the paper around, finishing by gluing the other end.

I just made a hole in the paper where the mouth was, then folded the paper back and into the container. I didn't bother gluing it, but you can if you want to. Attach googly eyes to complete the face. I made two holes in the lid, and weaved some yarn (about 8 inches) through the holes so that the ends were coming out the top. Take a long piece of yarn and fold in half multiple times, until you end up with a little bundle that is about 6 inches long. Center the bundle on top of the lid and use the long strands weaved through the lid to securely tie the bundle to the top. Then cut the loops so that all the strands are equal length, and trim the ends of the long strands too.

Make circles that will fit into the mouth and container. Label them 0-10 (or whatever numbers you want to work on, or letters if you want to do that instead).

While I was making the number cookies, my daughter decorated her monster with foam number stickers.
Now we're ready to work on numbers! Method 1: Ask your child to pick up a specific number. Help them find it if they are having trouble. Have them repeat the number to you, then let them feed it to the monster. Method 2: Have your child pick up a number. Ask them what number it is; help them if they are having trouble. Have them repeat the number, then feed it to the monster. If you think of other methods, let me know!

Bonus activity: Let your child be a number cookie monster too! Cut out sugar cookies in the shapes of numbers (or decorate them with the numbers on top), and use the same methods as above before allowing your little cookie monster to eat his/her own cookie!


Thursday, February 14, 2013

Activity: Mess-Free Painting

Can mess-free painting really exist? Yes! And my little girl had so much fun doing this for a Valentine's Day activity.


You'll need a closeable disposable box, paper shapes, craft paint, an applicator item (either disposable or something you don't mind washing paint off of), newspaper, and tape. Here's what you do:

Cut out shapes to be painted (we did hearts for Valentine's Day) and tape to the inside of a shoe box or similar container with enough space for an item to move around inside.

Add craft paint to the box -- it should not actually touch any of the paper.

Add applicator item(s). I loved the foil ball because it made cool patterns and I just threw it away when we were done. The little candle made some cool marks too, but I think I would have been fine with just the foil.

Tape the box closed and shake. Shake, shake, shake.

Shake more.

Open up the box and see your pretty painted shapes!


Lay them out on newspaper (or scrap paper) to dry. They all turned out different and beautiful. And my daughter was so excited to show everyone her Valentines (especially her daddy!)
Close Ups:


Thursday, January 24, 2013

Tutorial: Royal Icing Butterflies


See the full cake here.
I'm sorry I didn't have the forethought to document the step-by-step in pictures. So you'll just have to go off the photo of the finished thing. These need to be made at least 2 days in advance, to allow proper drying.

Here is the recipe I used to make the royal icing:
-2 lbs powdered sugar
-2 Tbsp meringue powder (or egg white powder, you may use 2 egg whites instead)
-1 Tbsp fresh lemon juice
-2/3 C water

Dissolve the meringue powder into the water, then throw everything into your stand mixer and let it go until it is a smooth, even consistency. It should have a "stiff peak" consistency, which means that the peaks of the icing look sharp and don't move. We will actually be using "soft peak" and "flooding" consistencies, but we want to start off with "stiff peak" in case you need to use it for any other decorations (such as flowers). If it is too soft, mix in more powdered sugar until you get the stiff peaks. Now put it all in an airtight container, because it dries quickly. Only pull out what you will be working with. To make the other consistencies, simply add water, little by little, until it is the right consistency. According to one of my books.


Stiff Peak - Suitable for most piping tasks. The icing peaks stay firm and sharp. Don't make it too firm or it will be difficult to pipe.

Soft Peak - This is the basic consistency for flat icing a cake. The icing should hold a peak that just falls over slightly at the tip.

Flooding - To "flood" a shape, the icing needs to be much looser. To test, spoon a little into a bowl and the lines and edges of any peaks should fade within 8 seconds.

What you'll need to make the butterflies:
-food coloring (I use AmeriColor gel dyes, but I think any food coloring will work)
-pastry bags (I prefer using parchment triangles and making disposable bags because it really minimizes the clean up time)
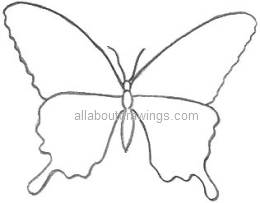
-template of butterfly outline(s)*
-wax paper or parchment paper
-Wilton tip 3 (or other small round tip)
-cardstock

*Note: I got the templates from the book Pretty Party Cakes, but any simple outline of butterfly wings would work.  Here's one I just found at the top of my Google search:
I like the ones that divide the wings into top and bottom sections, because it adds more definition and allows you to use multiple colors. But anyway, you want the wings to be 1.5 inches to 2 inches tall.

Directions
1. Mix your colors and prepare your pastry bags.
2. Put wax paper over template. Using Wilton tip 3 and soft peak icing, pipe the outline of the butterfly wings (do not pipe the body).
3. Use flooding icing to fill the top wings. If you will be decorating with sprinkles or sugar, apply now. Allow to dry.
4. Use flooding icing (in a complimentary color, if desired) to fill the bottom wings. It should meet the top wings (so the actual piped outline in the middle of the wing is no longer visible). As before, if you are using sprinkles or sugar, apply now. Allow to dry.
5. Repeat for all butterflies.You may also decorate them by piping dots in a contrasting color once the wings are dry.
6. Pipe a couple of feelers (antenna) for each butterfly in a matching color on a piece of wax paper.
7. Let everything dry and set for at least 2 days in a warm dry place.
8. Fold some pieces of cardstock or thin cardboard into a "V" shape to support the wings and line with a piece of folded wax paper.
9. Pipe a small line of royal icing in a color matching the butterfly into the fold of the paper. Lift the wings with a small spatula and place them in position on either side of the "V" shape. Allow to dry.
10. Pipe a head and a body in the middle between the wings and stick 2 feelers carefully into the head. Allow to dry in position for at least 3 hours.

Activity: Egg Carton Counters

I was in charge of teaching a math lesson for my daughter's educational toddler school. We made egg carton counters to focus on number recognition and counting. This is a very easy, inexpensive way to work on numbers with your child. Below, I describe five different activities you can do with your child to work on different aspects of number. Today we focused on the first three: recognizing and naming the number, counting up to a specific number, and learning what each number represents. The other two are more advanced, teaching the concepts of addition and subtraction.

Label the compartments of an egg carton with the numbers 1-12 in order.
I made little number cards (2.5"x1.75") out of cardstock and had each number on one card. I got all fancy and pulled out my Cricut machine to ink the numbers on. But you could just write them on scraps of paper if you didn't want to put that much effort into it. Anyway, there are several different activities you can do with these!

#1: Number recognition - teaches them to recognize the numbers out of sequence
I had my daughter randomly choose a number card, then I would ask her what number it was. She knew some of them. If she got it right I would say, "That's right! That's 2!" or whatever number it was. If she got it wrong or didn't answer at all, I would say, "That's 9. Can you say 'nine'?" Then I'd say "Okay, where does 9 go?" And she would find the spot. She likes pairing things up with their match, so this was probably her favorite part.

#2: Simple Counting - teaches them to count in sequence
I forgot to take a picture of this one, but this is what you do. You have the child select a number card, and you can repeat the steps for the number recognition activity. Once they put the number card in the corresponding compartment, you help them count up to it using the counters. We used Cheerios, which proved a little too distracting for some of the kids, but I was worried about them trying to eat beads or stick beans up their noses. Anyway, any small item will do. Then starting with the first compartment, you put one counter in each compartment -- counting out loud -- until you finally put one where the number card is. So your child picks 4, you have them say the number and put it in compartment #4. Then help them put in one Cheerio at a time as you count "1... 2... 3... 4!" Hopefully they count along with you.

#3: Number Values - teaches them what each number represents
Start the same way as before, by letting the child pick a number card. Then find the corresponding compartment and put that many counters in it. So if your child picks 5, you help them find the compartment labeled 5 and count out loud as you place five Cheerios (or other small item) into it. This helps them to see the number written, hear its name, and see that it represents a certain amount of things. You can leave the counters in the compartment as your child picks a new card, until they have gone through all 12.

#4: Addition (Advanced)
As your child becomes more familiar with numbers, you can use these to begin teaching them the concepts of addition and subtraction. For addition, set two small piles in front of them. Have them count how many Cheerios are in each pile. Let's say one pile has two and the other has four. You say, "We have two, and we have four. What is two plus four?" Then using the method described in Activity #2, use the compartments to count up to 6. Then reinforce, "Two plus four is six!"

#5: Subtraction (Advanced)
For subtraction, start with the counters already in the compartments. So let's say we start with six. Say "We have six Cheerios! What happens if we take away two? What is six minus two?" Take the counter from compartment 6 and sit it in front of the child while saying "One." Then take the counter from compartment 5 and add it to the pile while saying "Two!" Then explain "We took away two. How many are left?" Now help the child count the remaining four Cheerios. Reinforce: "We had six. We took away two. Now there are four. Six minus two is four!"

Wednesday, January 23, 2013

Tutorial: Royal Icing Flowers

See the full cake here.
Royal icing may be my new favorite decorating technique! I used the same flower piping techniques I learned using buttercream as a teenager taking my first Wilton classes. But royal icing not only holds its shape better, but it allows you to create them ahead of time. You can also rearrange them on the cake without destroying them.

Anyway, here is the recipe I used to make the royal icing:
-2 lbs powdered sugar
-2 Tbsp meringue powder (or egg white powder, you may use 2 egg whites instead)
-1 Tbsp fresh lemon juice
-2/3 C water

Dissolve the meringue powder into the water, then throw everything into your stand mixer and let it go until it is a smooth, even consistency. It should have a "stiff peak" consistency, which means that the peaks of the icing look sharp and don't move. There are also "soft peak" and "flooding" consistencies, but we want the stiff peak for flowers. If it is too soft, mix in more powdered sugar until you get the stiff peaks. Now put it all in an airtight container, because it dries quickly. Only pull out what you will be working with.

Now, what you'll need to make the flowers:
-food coloring (I use AmeriColor gel dyes, but I think any food coloring will work)
-pastry bags (I prefer using parchment triangles and making disposable bags because it really minimizes the clean up time)
-flower nail
-wax paper or parchment paper
-Wilton tips 3, 4, 104, 352

To color icing, put the amount you want in a separate bowl and immediately cover the rest to keep it from drying out. Here are instructions from a book for making the big 5-petal flowers and the daisies:

5-Petal Flower (white) and Daisey (pink) -- sorry one of them chipped as I was setting up for the picture.
5-Petal Flowers
1. From a sheet of parchment paper, cut small squares slightly larger than the flower to be piped.
2. Make a paper pastry bag an snip the tip off the empty bag to produce an opening large enough to fit a metal piping tip. Drop a Wilton 104 piping tip inside the bag, narrow end first.
3. Fill the bag with appropriately colored stiff-peak icing.
4. Pipe a small dot of icing on top of the flower nail, stick one of the paper squares on top, and hold the nail in one hand.
5. Hold the pastry bag in the other hand at a 45-degree angle to the nail, with the wide end of the tip touching the middle of the flower nail and the narrow end pointing out and slightly raised.
6. Squeeze out the first petal and give the nail a one-quarter turn as you move the nozzle out toward the edge of the flower nail. Use less pressure as you are moving back toward the middle and curve the nozzle slightly to give the petal a natural shape. Stop squeezing as the wide end touches the middle of the nail and lift up the tip.
7. Repeat this 4 more times to make all the petals.
8. Remove the flower with its base paper from the nail and leave to dry.
9. Pipe small yellow dots (using Wilton 4) into the middle as stamens.

Daisies
1. Use a Wilton 104 piping tip and some stiff-peak white royal icing.
2. Prepare your pastry bag and paper squares for the flower nail as above.
3. Mark the middle of the paper lined nail with a dot of icing.
4. Start at the outer edge of the nail, holding the wide end of the tip away from the middle and the narrow end towards the middle of the nail.
5. Slightly touch the paper with the wide end of the piping tip, squeeze out the icing and pull the tip toward the middle as you release the pressure. Stop and pull the tip away.
6. Repeat for 8 or more petals, while turning the nail appropriately.
7. Remove the flower with the base paper from the nail and leave to dry.
8. Pipe small yellow dots (using Wilton 4) into the middle as stamens.

The roses, rosebuds, and leaves I made from what I remember learning a long time ago, and I just made up the little yellow flowers. I'll try to give the best instructions I can.

Leaves, little flowers, and rosebuds (apparently I forgot to take a close up of the rose)
Little Flowers
1. Using a Wilton 104 piping tip and stiff-peak royal icing, make a dot and release pressure as you drag toward the middle.
2. Repeat for remaining 4 petals and allow to dry.

Leaves
1. Use a Wilton 351 piping tip and stiff-peak royal icing. One of the sharp points should be touching the wax paper, the other should be straight up in the air.
2. Briefly apply pressure to the piping bag, then release pressure and pull away.
3. For a slightly wider leaf, apply pressure a bit longer. For a ruffled leaf, apply pressure even longer and it will ruffle itself. End the same way, by releasing pressure and pulling away.

Rose
1. Using a Wilton 104 piping tip and stiff-peak royal icing, make a small mound of icing on the wax paper (on the flower nail).
2. With the wide end of the tip down and the skinny end pointing straight up, pipe icing on top of the mound while spinning the flower nail all the way around (you will create an upside-down cone).
3. Touching the wide end to the base of the cone, pipe as you turn the nail 1/3 of the way around. Release pressure and lift tip.
4. Turn the nail backwards a tiny bit and start the next petal so that it overlaps the one you just made by a little bit. Pipe as you turn the nail; release pressure and lift up.
5. Continue making petals around the flower until it is the size you want.

Rosebud
1. Use a Wilton 104 piping tip and stiff-peak royal icing. Place the wide end down on the wax paper, with the skinny end raised about 45 degrees.
2. Pipe and draw a figure "S" with the icing. Release pressure and lift tip. Allow to dry.
3. Following the directions about, pipe one or two small leaves directly on to the rosebud, starting at the base and pulling toward the top.

Tutorial: Sugar Frosted Fruit

Thinking about decorating a cake with fruit? Or perhaps making a centerpiece? Sugar frosting adds a little something special, and it is oh-so-easy to do!

Like the chocolate bowl? It's also super easy to do. Check out the tutorial here.

What you'll need:
Firm, fresh fruit. I used berries to decorate a cake, but apples and pears would make a stunning centerpiece.
Honey (and a small dish to put it in) and a decorating brush. You may also use a light-colored jam, such as apricot, in place of the honey.
Granulated sugar (and a second small dish). Many people suggest using super fine or caster sugar, but I found that regular granulated sugar worked well for me.
Here's what you do:

1) Using decorating brush, apply a thin,even coat of honey (or jam) all around the fruit. If you use too much, the sugar will melt into it and you will lose the crystallized effect. You will still get a very sparkly glaze, which look you might opt for anyway.
2) Roll honey-covered fruit in sugar until evenly coated.
3) Repeat for remaining fruit.
4) Put on display and wow your guests with a fancy sugar-frosted fruit display. It'll be our little secret just how easy this was!