 |
| Etsy listing |
Saturday, November 9, 2013
Etsy: Braided Pigtail Hat
A great option for little babies and girls with short hair, this clever take on an earflap hat has braided pigtails instead of braids on the ends of the earflaps. All the colors are completely customizable and you can order short braids (like in the picture) or long braids.
Etsy: Dog Hat
This is a perfect hat for any dog lover and features long hound dog ears instead of earflaps. It's cute and whimsical without being overly cartoonish, which makes it more popular with teens and adults.
 |
| Etsy listing |
Etsy: Puppy Hat
I made this to match my daughter's favorite stuffed animal and just love how cute and playful it turned out. I can make it in any color combination.
 |
| Etsy listing |
Thursday, November 7, 2013
Vintage Yarn for Sale
I have all this beautiful vintage yarn (mostly fingering weight mohair and alpaca yarns) sitting in bins in my shed because I just don't have the time to do anything with them. Since we're thinking of moving in the next six months, I figured I better start trying to find a new home for all of it. Send me an email if you would like to purchase any of this yarn (we can go through Etsy if you want to) or if you want to see more pictures of any of the yarn. There are special prices if you buy all the balls of a certain type of yarn. Otherwise, if you buy 1-10, they are $5 each; if you buy 11-20, they are $4.50 each; if you buy 21-30, they are $4 each; if you buy 31-50, they are $3.50 each; if you buy over 50, they are $3 each. If you are absolutely crazy about yarn (like I am) and are interested in buying everything, it would be $300 (that's about $1.50 each!). If you need me to ship it to you, the cost will be determined by how much you buy. (If you buy multiple lots of yarn and the per item cost is less than the total of the lot prices, I will give you the lower cost.)
*Prices are negotiable, this was just a starting point to give people an idea*
These are the categories: pure silk, pure wool, pure mohair, cashmere and lambswool, mohair blends, mohair and wool, wool blends, alpaca blends, cotton blends, synthetic yarns, and discount (these have no label and I am not sure what type of yarn they are, but both are still soft and unused).
PURE SILK
 |
| Silk (Unger brand) 100% Silk 3/4oz, 135 yards, Color 2 Aqua, Dye Lot E7993 4 balls: $14 for all 4 |
PURE WOOL
 |
| French Wool (Botany brand) 100% Virgin Wool 1 oz, Color 502 (pink) 1 ball: $4 for 1 |
 |
| French Wool (Botany brand) 100% Virgin Wool 1 oz, (red) 1 ball: $3 for 1 (discount for no label) |
 |
| French Wool (Botany brand) 100% Virgin Wool 1 oz, (off white) 1 ball: $3 for 1 (discount for no label) |
PURE MOHAIR
 |
| French Mohair (Nomotta brand) 100% Pure Mohair 1 oz/250 yards, Color 7602, Dye Lot 1 7 balls: $21 for all 7 |
 |
| Italian Mohair (Pauline Denham Yarns) 100% Mohair 3 balls: $12 for all 3 |
CASHMERE and LAMBSWOOL
 |
| English Cashmere Laine (Bernat brand) 50% Finest Tibetan Cashmere/50% Geelong Lambswool 1/2oz, 100 yards, Color 3733 Scarlet 14 balls: $33 for 14 balls |
 |
| English Cashmere Laine (Bernat brand) 50% Finest Tibetan Cashmere/50% Geelong Lambswool 1/2oz, 100 yards, Color 3727 Blossom Pink 15 balls: $34.50 for 15 balls |
MOHAIR BLENDS
 | ||
| French Mohair (Reynolds brand) 85% Mohair/15% Vinyan 40g, Color 8, Dye Lot F6943 9 balls: $27 for all 9
|

 | ||||
| Mohair (Spinnerin brand) 67% Mohair/33% Orlon 1 oz/28.4g, Color 125, Dye Lot 6092 8 balls: $24 for all 8
|


 |
| Swiss Acrylic/Mohair (Lang brand) 87% Acryl/13% Mohair 40 g, Color 1: 2681 (raspberry), Color 2: 2686 (burgundy) 10 balls of each color: $30 for all 10 |
MOHAIR and WOOL
 |
| English Mohair (Fleece Gold brand) 76% Mohair/20% Wool/4% Nylon 1 oz, Color 58, Dye Lot 2 1 ball: $4 for 1 |
 |
| Mohairlaine (Bernat brand) 62% Mohair/19% Virgin Wool/19% Nylon 1 oz, color 7542 White 9 balls: $27 for all 9 |
 |
| Mohairlaine (Bernat brand) 62% Mohair/19% Virgin Wool/19% Nylon 1 oz, color 7518 Eggshell 16 balls: $36 for all 16 |
 | ||
| Mohairlaine (Bernat brand) 62% Mohair/19% Virgin Wool/ 19% Nylon 1 oz, Color 7527 Peach Blossom 7 balls: $21 for all 7
|

 |
| Wool/Mohair (Ayr Scotch Wools) 65% Wool/35% Kid Mohair 1 oz, Color Flowering Currant, Dye Lot 320 1 ball: $4 for 1 |
 |
| Wool/Mohair (Ayr Scotch Wools) 65% Wool/35% Kid Mohair 1 oz, Color Sabrina, Dye Lot 319 8 balls: $24 for all 8 |
WOOL BLENDS
 |
| Wool/Rayon blend (Pauline Denham Yarns) 69% Wool/31% Rayon 3/4oz, Color 148 Pink, Dye Lot 81781 5 balls: $17.50 for all 5 |
ALPACA BLENDS
 | ||
| Italian Alpaca (Bucilla brand) 60% Alpaca/40% Acrylic 28 g/1 oz, Color 8 (peach), Dye Lot 336 3 balls: $12 for all 3
|

COTTON BLENDS
 |
| (West) German Cotton Chenille (Crystal Palace Yarns) 70% Cotton/30% Rayon 1.75oz/120 yards, Color 411, Dye Lot 1610 2 balls: $8 for all 2 |
 |
| Rayon/Cotton blend (Pauline Denham Yarns) 60.7% Rayon/39.3% Cotton 1 oz/140 yards, Color 807 Lt Blue, Dye Lot 2025C 6 balls: $21 for all 6 |
SYNTHETIC (ACRYLIC, NYLON)
 | ||||
| Acrylic (Fleishers brand) 100% DuPont Acrylic 1 oz, Color 108 4 balls: $14 for all 4
|


DISCOUNT FOR NO LABEL
 |
| Mohair? (no label) light peach color 2 balls: $5 for all 2 (discount because of no label) |
 |
| Wool? (no label) blue 8 balls: $16 for all 8 (discount for no label) |
Tuesday, October 29, 2013
Etsy: Angel Baby Necklace Pendant
As my friend is approaching her daughter's first angelversary, I wanted to make something special for her. I know everybody handles grief differently, but I wanted to offer a small, affordable way for other moms like me to carry the memory of their child close to their heart. I designed the pendant to be two tiny feet that look like wings, to represent the little angels. Each pendant is personalized with the baby's initials and a heart in the color of their birthstone.
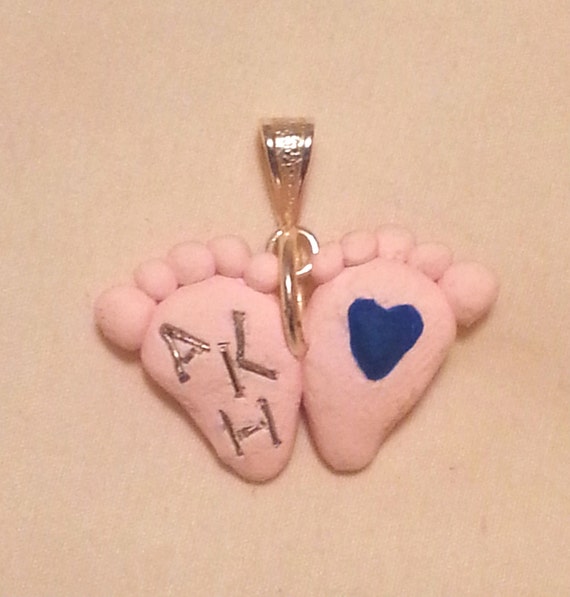 |
| Angel Baby Necklace Pendant |
Etsy: Fuzzy Panda Pattern
I finally got caught up with all my Halloween orders and had a chance to write up another pattern! This panda hat is one of my favorites, and I'm hoping other people are just as eager to make one!
 |
| Etsy listing ($5) Ravelry listing ($4.99) |
Wednesday, October 23, 2013
Etsy: Flowered Scallop Hat
I absolutely love the way this little hat worked out! The scallop stitching gave it a very dainty, feminine look. The flowers and feathers are on a clip, so they can be removed and worn on the hair when it is too hot for a hat. These are absolutely perfect for newborn photo shoots!
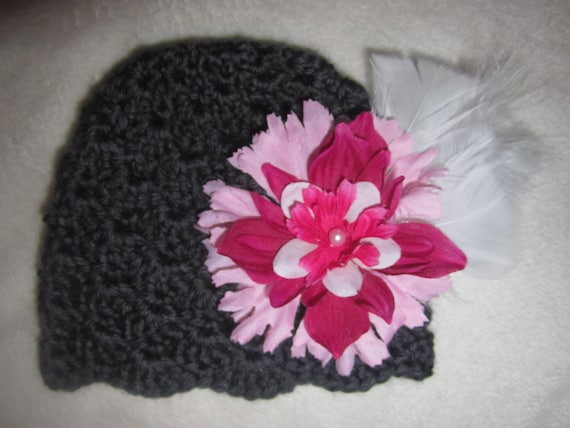 |
| Buy one here! |
Subscribe to:
Posts (Atom)