 |
| Etsy listing ($5) Ravelry listing ($4.99) |

Showing posts with label pattern. Show all posts
Showing posts with label pattern. Show all posts
Tuesday, October 29, 2013
Etsy: Fuzzy Panda Pattern
I finally got caught up with all my Halloween orders and had a chance to write up another pattern! This panda hat is one of my favorites, and I'm hoping other people are just as eager to make one!
Wednesday, October 23, 2013
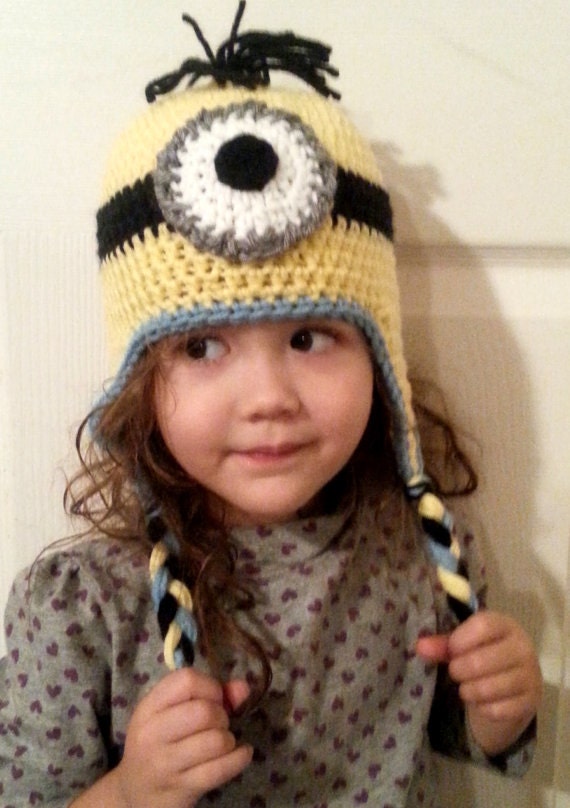
Etsy: Minion Hat Pattern
Since the Minion hat proved to be such a good seller, I wrote up the pattern to offer for sale as well. It includes sizes 0-3 month, 3-6 month, 6-12 month, 1-3 year, 3-6 year, and 6-12 year. I will be adding adult sizes soon as well. It also includes instructions for how to make it with one eye, as well as with two, and instructions for doing both hairstyles.
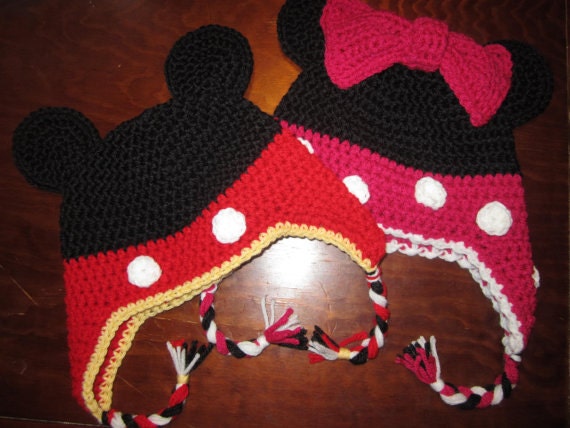
Etsy: Mickey and Minnie Pattern
It's no surprise that hat orders start slowing down as the weather warms up, so I didn't bring any yarn with me this summer. But I was pleasantly surprised to get several orders for Mickey Mouse hats, despite the warm weather. I guess they're just that cute! Well, hubby had a brilliant idea that I should write up more of my original patterns and offer them on Etsy as well. So I decided to start with the Mickey and Minnie hat patterns, since they are popular all year around. I offer them for $5 each, or $7 total if you buy both together.
 |
| Pattern listing here |
Monday, February 11, 2013
Etsy: Cute Amigurumi Giraffe Pattern
I came up with this pattern when making a gift for a friend's daughter. She loves giraffes, and I wanted it to fit in with all her other things. My favorite part is probably the spots on the back (which weren't as hard as I thought they would be!) Since it's more expensive to ship stuffed items, I just sell the pattern.
 |
| See Etsy listing here ($5.00) See Ravelry listing here ($4.99) |
Wednesday, January 30, 2013
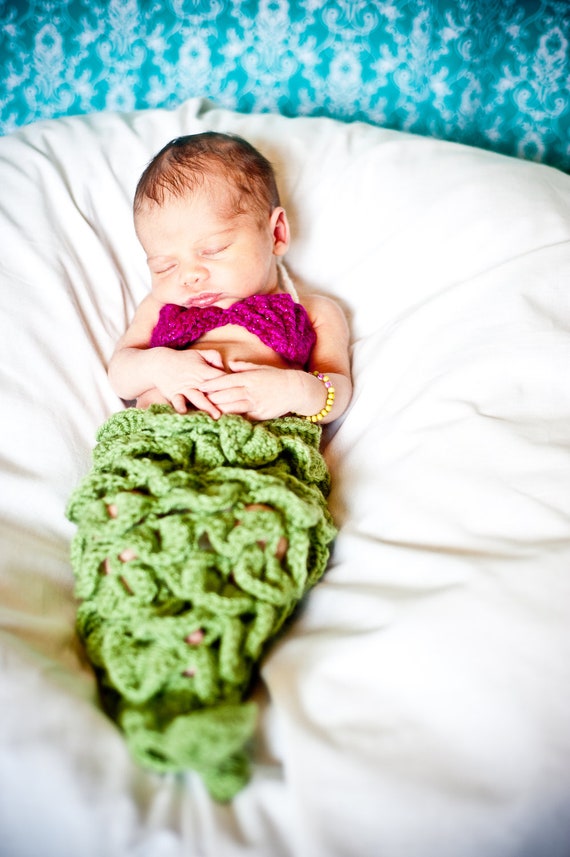
Etsy: Mermaid Pattern
Another huge seller in my Etsy shop is this pattern for a mermaid costume/photo prop. I came up with the pattern while I was expecting my second daughter, and used it during her newborn photo shoot (she was about 10 days old in this picture). It has instructions for making up to size 6-9 month. I do make these completed for $50, but because the timing depends on my schedule, I accept orders on a case-by-case basis.
 |
| See Etsy listing here ($5.00) See Ravelry listing here ($4.99) |
Monday, January 28, 2013
Pattern: Lacy Bonnet Cap


The Pattern
This is for sizes 1-3 years (pictured) and 3-6 years (slightly longer brim). I will write up the other sizes in the future.
MATERIALS
Worsted weight yarn in main color (MC)
Worsted weight yarn in white/contrasting color (CC)
I/9 hook
INSTRUCTIONS
Rnd 1: With MC, make 8hdc in a magic ring, slst to join (8hdc)
Rnd 2: Ch2 (counts as first hdc here and in rest of pattern), hdc in same stitch as joining. 2hdc in each remaining stitch, slst to top of ch2 (16hdc)
Rnd 3: Ch2, 2hdc in next stitch, [1hdc in next, 2hdc in next] 7 times, slst (24hdc)
Rnd 4: Ch2, 1hdc in next stitch, 2hdc in next stitch, [1 hdc in each of next 2 stitches, 2hdc in next] 7 times, slst (32hdc)
Rnd 5: Ch2, 1hdc in each of next 2 stitches, 2hdc in next stitch, [1 hdc in each of next 3 stitches, 2hdc in next] 7 times, slst (40hdc)
Rnd 6: Ch2, 1hdc in each of next 3 stitches, 2hdc in next stitch, [1 hdc in each of next 4 stitches, 2hdc in next] 7 times, slst (48hdc)
Rnd 7: Ch2, 1hdc in each of next 4 stitches, 2hdc in next stitch, [1 hdc in each of next 5 stitches, 2hdc in next] 7 times, slst (56hdc)
Rnds 8-17: Ch2, 1hdc in each stitch around, slst (56hdc)
If making size 1-3years, fasten off and skip to Rnd 19. Otherwise, continue to Rnd 18.
Rnd 18: Ch2, 1hdc in each stitch around, slst, FO (56hdc)
Rnd 19: With CC, join in last stitch of previous round with slst. *Skip 1 stitch, 5dc in next stitch, skip 1 stitch, slst in next stitch: shell made.** Repeat from * to ** 13 more times, ending with a slst in the same stitch as 1st of this round. Fasten off. (14 shells)
Variation: For a slightly lacier look, complete Rnd 19 as follows --
With CC, join in last stitch of previous round with slst. *Ch1, skip 1 stitch, [dc, ch1, dc] in next stitch, ch1, skip 1 stitch, slst in next stitch: shell made.** Repeat from * to ** 13 more times, ending with a slst in the same stitch as 1st of this round. Fasten off. (14 shells)
Wednesday, January 23, 2013
Pattern: Basic Earflap Hat (6-12 years)
When I started learning how to crochet, I relied heavily on free
patterns. So in order to return the favor, pay it forward, and help the
next generation of crocheters, here is my pattern for a basic earflap
hat.
Sizes 1-3 years and 3-6 years
MATERIALS:
U.S. Size I/9 (5.50mm) crochet hook
Worsted weight yarn
6-12 years
Rnd 1: In a magic ring, make 8sc, slst to join. (8sc)
Rnd 2: Ch2 (counts as first hdc here and in rest of pattern), hdc in same st as joining, 2hdc in each remaining stitch, sl st to join. (16 hdc)
Rnd 3: Ch2, 2hdc in next stitch, [1hdc in next, 2hdc in next] 7 times, sl st to join. (24 hdc)
Rnd 4: Ch2, 1hdc in next, 2hdc in next, [1hdc in each of next 2, 2hdc in next] 7 times, sl st to join. (32 hdc)
Rnd 5: Ch2, 1hdc in each of next 2 stitches, 2hdc in next, [1hdc in each of next 3, 2hdc in next] 7 times, sl st to join. (40 hdc)
Rnd 6: Ch2, 1hdc in each of next 3 stitches, 2hdc in next, [1hdc in each of next 4, 2hdc in next] 7 times, sl st to join. (48 hdc)
Rnd 7: Ch2, 1hdc in each of next 4 stitches, 2hdc in next, [1hdc in each of next 5, 2hdc in next] 7 times, sl st to join. (56 hdc)
Rnd 8: Ch2, 1hdc in each of next 5 stitches, 2hd in next, [1hdc in each of next 6, 2hdc in next] 7 times, sl st to join. (64 hdc)
Rnds 9-18: Ch2, 1hdc in each stitch, sl st to join. (64 hdc)
After Rnd 18, fasten off.
Fold hat in half so that joining seam is entirely on one side (this will be the back). Go to one of the edges; the fold is where the middle of the earflap will be.
EARFLAP #1
Row 1: Starting 6 stitches to the right of the folded stitch, attach yarn with sc. 1 sc in each of next 12 stitches. (13 sc)
Rows 2-12: Ch1, turn, sc2tog, 1sc in each remaining stitch. (Row 12 will have 1 sc2tog and 1 sc)
Row 13: Ch1, turn, sc2tog. Fasten off.
EARFLAP #2
Row 1: Starting on the left of finished earflap, skip 19 stitches. Attach yarn with sc in next stitch. 1 sc in each of next 12 stitches. (There should be 19 open stitches on each side of the earflap.) (11 sc)
Rows 2-12: Ch1, turn, sc2tog, 1sc in each remaining stitch. (Row 12 will have 1 sc2tog and 1 sc)
Row 13: Ch1, turn, sc2tog. DO NOT fasten off.
BORDER
Row 1: Beginning at corner of earflap #2, ch1, sc evenly around edge, making 3sc in the corner of each earflap, sl st to join. If you are adding a contrasting color around the edge, fasten off. Otherwise, complete Row 2 with same color.
Row 2: If you are using a contrasting color for the edge, attach with sc. Otherwise, ch1 and sc in same stitch as joining. 1sc in each stitch around, but make 2sc in the corners of each earflap. Sl st to join and fasten off.
Pattern: Basic Earflap Hat (1-3 years and 3-6 years)
When I started learning how to crochet, I relied heavily on free patterns. So in order to return the favor, pay it forward, and help the next generation of crocheters, here is my pattern for a basic earflap hat. (I will eventually publish all sizes, but I wanted to at least get up what I have written down already).
Size 6-12 years
MATERIALS:
U.S. Size I/9 (5.50mm) crochet hook
Worsted weight yarn
1-3 years/3-6 years
For 1-3 years:
Rnd 1: In a magic ring, make 8sc, slst to join. (8sc)
For 3-6 years:
Rnd 1: In a magic ring, make 8 hdc, sl st to join. (8 hdc)
The rest of the pattern (except round 17) is the same for both sizes.
Rnd 2: Ch2 (counts as first hdc here and in rest of pattern), hdc in same st as joining, 2hdc in each remaining stitch, sl st to join. (16 hdc)
Rnd 3: Ch2, 2hdc in next stitch, [1hdc in next, 2hdc in next] 7 times, sl st to join. (24 hdc)
Rnd 4: Ch2, 1hdc in next, 2hdc in next, [1hdc in each of next 2, 2hdc in next] 7 times, sl st to join. (32 hdc)
Rnd 5: Ch2, 1hdc in each of next 2 stitches, 2hdc in next, [1hdc in each of next 3, 2hdc in next] 7 times, sl st to join. (40 hdc)
Rnd 6: Ch2, 1hdc in each of next 3 stitches, 2hdc in next, [1hdc in each of next 4, 2hdc in next] 7 times, sl st to join. (48 hdc)
Rnd 7: Ch2, 1hdc in each of next 4 stitches, 2hdc in next, [1hdc in each of next 5, 2hdc in next] 7 times, sl st to join. (56 hdc)
Rnds 8-16: Ch2, 1hdc in each stitch, sl st to join. (56 hdc)
If you are making size 1-3 years, fasten off after Rnd 16. If you are making size 3-6 years, continue to Rnd 17.
Rnd 17: Ch2, 1hdc in each stitch, sl st to join, fasten off. (56 hdc)
Fold hat in half so that joining seam is entirely on one side (this will be the back). Go to one of the edges; the fold is where the middle of the earflap will be.
EARFLAP #1
Row 1: Starting 5 stitches to the right of the folded stitch, attach yarn with sc. 1 sc in each of next 10 stitches. (11 sc)
Rows 2-10: Ch1, turn, sc2tog, 1sc in each remaining stitch. (Row 10 will have 1 sc2tog and 1 sc)
Row 11: Ch1, turn, sc2tog. Fasten off.
EARFLAP #2
Row 1: Starting on the left of finished earflap, skip 17 stitches. Attach yarn with sc in next stitch. 1 sc in each of next 10 stitches. (There should be 17 open stitches on each side of the earflap.) (11 sc)
Rows 2-10: Ch1, turn, sc2tog, 1sc in each remaining stitch. (Row 10 will have 1 sc2tog and 1 sc)
Row 11: Ch1, turn, sc2tog. DO NOT fasten off.
BORDER
Row 1: Beginning at corner of earflap #2, ch1, sc evenly around edge, making 3sc in the corner of each earflap, sl st to join. If you are adding a contrasting color around the edge, fasten off. Otherwise, complete Row 2 with same color.
Row 2: If you are using a contrasting color for the edge, attach with sc. Otherwise, ch1 and sc in same stitch as joining. 1sc in each stitch around, but make 2sc in the corners of each earflap. Sl st to join and fasten off.
Tuesday, April 24, 2012
Pattern: Ruffled Purse
MATERIALS
worsted weight yarn, any color
I/9 (5.5mm) crochet hook
plastic snap (optional)
material for lining (optional)
SPECIAL STITCHES
pair Xdc = pair of crossed dcs [skip 1 stitch, dc in next stitch, then dc in skipped stitch]
Xdcdec = crossed dc decrease [skip 2 stitches, yarn over, insert in next stitch, yarn over and pull a loop through, yarn over and pull through two loops; yarn over, insert in next stitch, yarn over and pull a loop through, yarn over and pull through two loops, yarn over and pull through all three loops. yarn over, insert in first skipped stitch, yarn over and pull a loop through, yarn over and pull through two loops; yarn over and insert in second skipped stitch, yarn over and pull a loop through, yarn over and pull through two loops, yarn over and pull through all three loops]
PURSE
Rnd 1: Ch 28, sc in 2nd ch from hook, 1sc in each of next 25, 3sc in last ch. Working along bottom of starting chain (do not turn), 1sc in each of next 25, 2sc in last chain, sl st to join. (56sc)
Rnd 2: Ch1, 2sc in same stitch as joining, 1sc in each of next 25, 2sc in each of next 3, 1sc in each of next 25, 2sc in each of next 2, sl st to join. (62sc)
Rnd 3: Ch1, sc in same stitch as joining, 2sc in next stitch, 1sc in each of next 26, [2sc in next, 1sc in next] twice, 2sc in next, 1sc in each of next 26, 2sc in next, 1sc in next, 2sc in next, sl st to join. (68sc)
Rnd 4: Ch1, sc in same stitch as joining, 2sc in next stitch, 1sc in each of next 27, [2sc in next, 1sc in each of next 2] twice, 2sc in next, 1sc in each of next 27, 2sc in next, 1sc in each of next 2, 2sc in next, 1sc in next, sl st to join (76sc)
Rnd 5: Ch1, sc in same stitch as joining, 1sc in next stitch, 2sc in next stitch, 1sc in each of next 28, [2sc in next, 1sc in each of next 3] twice, 2sc in next, 1sc in each of next 28, 2sc in next, 1sc in each of next 3, 2sc in next, 1sc in next, sl st to join. (80)
Rnds 6-10: Ch3 (counts as first dc in Xdc), dc in previous stitch. Work 39 more pairs Xdc. Sl st to top of beginning ch3 to join. (80dc)
Rnd 11: Ch 3 (counts as first dc in Xdc), dc in previous stitch. Work Xdcdec over next 4 stitches, work 18 pairs of Xdc, work Xdcdec over next 4 stitches, work 17 pairs of Xdc. Sl st to top of beginning ch3 to join. (76dc)
Rnds 12-15: Ch3 (counts as first dc in Xdc), dc in previous stitch. Work 37 more pairs Xdc. Sl st to top of beginning ch3 to join. (76dc)
Rnd 16: Ch3 (counts as first dc in Xdc), dc in previous stitch. Work 2 more pairs Xdc, work Xdcdec over next 4 stitches, work 17 pairs of Xdc, work Xdcdec over next 4 stitches, work 14 pairs of Xdc. Sl st to top of beginning ch3 to join. (72dc)
Rnds 17-18: Ch3 (counts as first dc in Xdc), dc in previous stitch. Work 35 more pairs Xdc. Sl st to top of beginning ch3 to join. (72dc)
Row 19: Sl st in each of next 12 stitches. Ch 1, sc in same stitch, 1sc in each of next 33 stitches. (34sc)
Row 20-30: Ch1, turn, 1sc in same stitch and in each stitch across. (34sc)
Row 31: Ch1, turn, beginning with same stitch sc2tog, 1sc in each stitch across to last 2, sc2tog (32sc)
Row 32: Ch1, turn, 1sc in same stitch and in each stitch across (32sc)
Rows 33-34: Repeat rows 31 and 32. (30sc)
Rows 35-37: Ch1, turn, beginning with same stitch sc2tog, 1sc in each stitch across to last 2, sc2tog (28sc, 26sc, 24sc)
Row 38: Ch1, turn, beginning with same stitch sc2tog, sc2tog, 1sc in each stitch across to last 4, sc2tog twice. Fasten off. (20sc)
RUFFLE
Row 1: Attach to side of first sc in Row 19 with sl st. Ch3 (counts as first dc), dc in same stitch, 2dc in each stitch (or side of stitch) around flap. (116dc)
Row 2: Ch3 (counts as first dc), dc in each stitch across. Fasten off. (116dc)
STRAP
Row 1: Ch 6, 1sc in 2nd ch from hook and in each of remaining 4 chains. (5sc)
Row 2: Ch 1, turn, 1sc in same stitch and in each of next 4. (5sc)
Repeat Row 2 until strap measures 24 inches. Fasten off. Attach strap to sides of purse next to sc's on either side of Row 19.
FINISHING
I recommend lining this purse if you are going to put any small items in it. I used my KAM pliers to attach plastic snaps. I put the top snap in the center of the flap (near the ruffle), and I put the bottom snap through the lining and yarn where I wanted the flap to attach.
Sunday, January 1, 2012
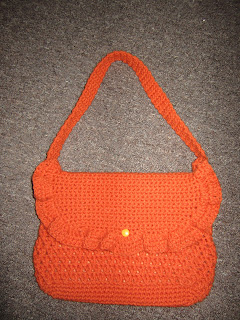
Crocodile Stitch Purse

I lined it with some plum-colored satin that I had in my stash, and finished it off with a snap using my new KAM pliers!

Rnd 1: ch 38, sc in 2nd ch from hook and in each of next 35 chs, 5 sc in last ch, working on opposite side of ch, sc in each of next 35 chs, 4 sc in last ch, join (see Pattern Note) in beg sc. (80 sc)
Rnd 2: Ch 1, sc in each of first 37 sts, 3 sc in next st, sc in next st, 3 sc in next st, sc in each of next 37 sts, 3 sc in next st, sc in next st, 3 sc in last st, join in beg sc. (88 sc)
Rnd 3: Ch 1, sc in each of first 38 sts, 3 sc in next st, sc in each of next 3 sts, 3 sc in next st, sc in each of next 39 sts, 3 sc in next st, sc in each of next 3 sts, 3 sc in next st, sc in last st, join in beg sc. (96 sc)
Rnd 4 start crocodile stitch ch 1, dc in same st, ch 1, sk 2 sts, *2 dc in next st, ch 1, skip 2 sc, dc in next st, ch 1*, repeat to end, ch 1
Rnd 5: Without turning work over turn your work 90 degrees *5 dc around post in second dc, Flip work around and put 5 dc around post of other dc, Sl st around single dc*; repeat * to end
Next round: ch 1, put 2 dc in each single dc and 1 dc in space between 2 dc
Make 9 rows of crocodile st (and 9 rows of dc)
Sc in each crocodile st (6 sc) - you will have 96 sc in this row
Do 2 more rows of sc
Fasten off
Straps (make 2)
Chain 101 sts, sc in 2nd ch from hook and in each chain to end (100 sc), ch 1, turn
Row 2: SC in each st, ch 1, turn (100 sc)
Row 3 and 4: Repeat Row 2
Sl stitch down both sides and sew strap to purse
Cut lining to fit inside and sew lining in to the purse.
Tuesday, May 3, 2011
Pattern: Baby Armwarmers

I made up the pattern for the armwarmers, so I'm trying to remember what I did. I think I started with ch40 and joined in a ring with a slst. Then I did a row of hdc. I did three rows (I think) with 3sc, 2fpdc repeated around. On the fourth row, I did a twisted fpdc (3sc, fpdc in 2nd fpdc of previous row, fpdc in 1st fpdc of previous row) around. I did this until it was half the length I wanted to end with. Then I worked 8 rows where I did one sc2tog per row (in the first 3sc space on the first row; in the second 3sc space on the second row; until the 8th row results in 2sc, 2fpdc, all the way around). Then I made a scalloped edge by doing a ch6 (I think) and a slst every 4 stitches. When I put it on her, I put her thumb through one of the holes, because I thought it looked more chic that way. I don't remember how I made the slippers... sorry!
**Update: Well, now that I'm actually writing patterns, this looks pretty sad... I'll try to spruce it up. Oh, and figure out what size hook I used and what weight of yarn :)
Subscribe to:
Posts (Atom)