Please be patient while I make this blog pretty and add more content.
Take a look at my Etsy shop to see what items I have for sale:
www.createdbykelli.etsy.com

Thursday, February 28, 2013

Tutorial: $2 Quilted Name Board


This is a super cute way to decorate a wall, and it's so affordable -- like under $2 affordable! The first time I did this, I just used the side of a cardboard box, and it ended up warping because of the Mod Podge. So this time I used foam core (I got this 20"x30" board for about $1.50). Then you need at least 5 sheets of 12"x12" scrapbooking paper. I used 9 so that I could get more patterns on here (and it made enough squares to cover two of these, since I have two daughters). When I do projects like this, I love to use paper from a paper stack because the colors are already perfectly coordinated. These sheets came from a giant 360-sheet stack, which I got for $10 during a sale at JoAnn's. So each sheet cost a little less than 3 cents. 9 sheets comes to 25 cents, and this is enough to cover two boards. Plus, I made my own Mod Podge: combine 1 part white glue and 1 part water in a clean glass jar with a lid; shake until it is evenly combined, and voila! It cost less than a dollar and I had so much leftover.

Cut each patterned sheet into two 6"x6" squares, three 4"x4" squares, and six 2"x2" squares. To cover the 20"x30" board, you need nine 6" squares, thirteen 4" squares, and seventeen 2" squares. I like to distress the edges of each square with an ink pad, because I love the added depth and texture it gives.
I start in the top corner and lay out the squares, making sure not to have two squares of the same pattern touching. Then I take a picture so I can remember where to put them with the Mod Podge.
Starting in the top left corner, I applied a thin layer of homemade Mod Podge to the board -- enough for one square. Then I apply the paper. Smooth across, then down, always working away from the starting corner. This will help avoid wrinkles and air bubbles. I slowly work my way down and across, applying Mod Podge for just a couple squares at a time. It takes a while, but try to be precise. I did end up with a fairly large gap in the top right. If you are like me and cut the squares slightly off, you may need to trim the edges around the board. I also re-distressed the paper along the edges of the board to make it look more finished.
Next, I cut out letters for my daughter's name. I used two sheets (well, one whole sheet and half of two other sheets). One of my weird, useful, but non-marketable talents is being able to write letters backwards. If this is not your forte, you can write the letter on a plain piece of paper, or even print out a font that you like. Cut out the letter, turn it backwards, and trace it on to the white side of the scrapbooking paper. When you cut it out, you will have perfect letters showing the pattern. I also distressed the edges of the letters (I used red for the squares, and white on the letters, to give it more contrast).
Then I wrote out her middle name in cursive (this took two sheets). You can do the same method as before, just using script letters, or print if you want. I inked the edges (in red). To attach the letters, I spread a thin layer of Mod Podge on the under side of the letters, one at a time, and applied it to the board, starting on one side and working to the other to avoid wrinkles. For the cursive, I started applied Mod Podge one letter at a time, being careful not to crease the paper when lifting the remaining letters.
Once everything is dry, use Command Velcro Strips for a no-damage way to hang this from the wall!

Activity: Yarn Outlined Letters

This is a fun, slightly messy way for your child to help you make some cute decor for their room (and get some more exposure to letters). We just used my daughter's first initial, but you could do this for all the letters in their name if you wanted to.

Write letter on craft foam.

Trace letter with white glue and help your child "trace" over the glue with yarn.

The finished product! (It will look better when the glue dries)

Activity: Window Painting

This is another great activity to do with your kids! You can help them practice letters and numbers, or just let them express their artistic side! The best part is, you can keep your child entertained for quite a while, with minimal effort on your part :)

Paint this washable project paint all over a glass door (or a big mirror would be really fun too).

Dip Q-tips in water and use them to "reverse paint" (the paint washes off wherever the Q-tip touches). Lots of fun, and easy clean up (thank goodness!)

Activity: Letter Sculptures

This is a fun, hands-on activity for kids to work with letters. If you want to preserve your child's work (I'm thinking about using it to decorate her room), this air-dry clay is great. Otherwise, any sort of play dough is good.


Give your child a ball of clay.

Help them roll it out so it's long and thin.

Help them create the letter (we did her initial, which is why I think it would be a fun decoration).

And you can make a handprint in some of the extra clay, because that's always fun to do!

Recipe: 4-ingredient GF PB Cookies

You just need four ingredients to make these delicious, gluten-free peanut butter cookies!


INGREDIENTS
1 C creamy peanut butter
1 C sugar
1 egg
1 t vanilla

DIRECTIONS
Preheat oven to 325F. Combine all ingredients; let sit for 10 minutes. Drop spoonfuls on to ungreased baking sheet and press down with fork. Cook for 10 minutes, or until edges are golden brown. Makes about 18 cookies.

Monday, February 25, 2013

Etsy: Hello Kitty for Grownups

Sometimes you just want to embrace your inner child. That's why I've made a new listing in my Etsy shop to offer this cute Hello Kitty hat in teen and adult sizes. Hurry on over and order yours today!

See Hello Kitty Hat listing here

Thursday, February 21, 2013

Activity: Number Cookie Monster

This is an incredibly fun way to work on numbers (or letters) with your child! It's quick and easy to make, and they will love feeding their cookie monster the number cookies. Here are the directions (along with a couple ways to use the number cookie monster to teach your child). There's also a bonus activity at the bottom!

Start with an empty Pringles can (or similar container). Measure and cut a piece of plain paper so that it will wrap around and cover the container. Have your child color the paper while you cut out a "mouth" in the container.
Using regular ol' white glue, adhere the paper to the container. I stuck on one edge first, put some glue around the mouth, then wrapped the paper around, finishing by gluing the other end.

I just made a hole in the paper where the mouth was, then folded the paper back and into the container. I didn't bother gluing it, but you can if you want to. Attach googly eyes to complete the face. I made two holes in the lid, and weaved some yarn (about 8 inches) through the holes so that the ends were coming out the top. Take a long piece of yarn and fold in half multiple times, until you end up with a little bundle that is about 6 inches long. Center the bundle on top of the lid and use the long strands weaved through the lid to securely tie the bundle to the top. Then cut the loops so that all the strands are equal length, and trim the ends of the long strands too.

Make circles that will fit into the mouth and container. Label them 0-10 (or whatever numbers you want to work on, or letters if you want to do that instead).

While I was making the number cookies, my daughter decorated her monster with foam number stickers.
Now we're ready to work on numbers! Method 1: Ask your child to pick up a specific number. Help them find it if they are having trouble. Have them repeat the number to you, then let them feed it to the monster. Method 2: Have your child pick up a number. Ask them what number it is; help them if they are having trouble. Have them repeat the number, then feed it to the monster. If you think of other methods, let me know!

Bonus activity: Let your child be a number cookie monster too! Cut out sugar cookies in the shapes of numbers (or decorate them with the numbers on top), and use the same methods as above before allowing your little cookie monster to eat his/her own cookie!


Thursday, February 14, 2013

Activity: Mess-Free Painting

Can mess-free painting really exist? Yes! And my little girl had so much fun doing this for a Valentine's Day activity.


You'll need a closeable disposable box, paper shapes, craft paint, an applicator item (either disposable or something you don't mind washing paint off of), newspaper, and tape. Here's what you do:

Cut out shapes to be painted (we did hearts for Valentine's Day) and tape to the inside of a shoe box or similar container with enough space for an item to move around inside.

Add craft paint to the box -- it should not actually touch any of the paper.

Add applicator item(s). I loved the foil ball because it made cool patterns and I just threw it away when we were done. The little candle made some cool marks too, but I think I would have been fine with just the foil.

Tape the box closed and shake. Shake, shake, shake.

Shake more.

Open up the box and see your pretty painted shapes!


Lay them out on newspaper (or scrap paper) to dry. They all turned out different and beautiful. And my daughter was so excited to show everyone her Valentines (especially her daddy!)
Close Ups:


Monday, February 11, 2013

Etsy: Lacy Hat and Scarf Set

Anybody else ready for the weather to start warming up a bit? As we approach the end of winter, you might want to ditch the heavy hats and scarves for this lighter lacy set. Perfect for those in-between spring days, this soft, comfortable hat and scarf will keep you warm without overdoing it. You can order a regular scarf, or an infinity style. I will make this in any size, even though I only have a listing for children's sizes at the moment. If you are interested in a larger size, just send me a message and I'll make a listing for you right away!
See listing here
As an infinity scarf
The infinity scarf may also be worn as a cowl

Etsy: Beaded Friendship Bracelets

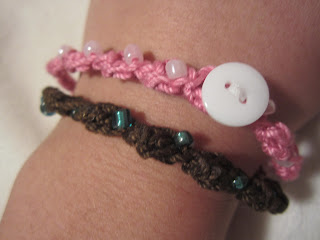
I love the way these beaded bracelets turned out! I have customizable options in my Etsy shop: pick your thread color and bead color. I think they make super cute friendship bracelets, but I also just like them for everyday wear. They're comfortable and add just enough sparkle. They have a special meaning to me, serving as reminder bracelets. I know we want to have more kids one day, but I really need to get healthy first. It's hard, and a lot of work, and a lot of times I forget how important it is. So I wear one of these on each wrist (because I can't eat junk food without my hands). They represent the son (brown) or daughter (pink) that will join our family once I can get healthy enough. Now every time I reach for something, I see my bracelet and ask myself if it will help bring me closer to my goal. So far it's working!

Get yours here!

Etsy: Cute Amigurumi Giraffe Pattern

I came up with this pattern when making a gift for a friend's daughter. She loves giraffes, and I wanted it to fit in with all her other things. My favorite part is probably the spots on the back (which weren't as hard as I thought they would be!) Since it's more expensive to ship stuffed items, I just sell the pattern.

See Etsy listing here ($5.00)
See Ravelry listing here ($4.99)

Wednesday, February 6, 2013

Etsy: Easter Hats

Well, I missed the window to make Valentine's Day sales in my Etsy shop, so I wanted to make sure I was on top of things for Easter. I came up with these sweet, simple Easter hats and totally love how adorable they turned out.

My little models just weren't interested in smiling for me today!

Sweet Baby Chick Hat

Sweet Bunny Hat

Etsy: Fuzzy Panda Hat

Check out the newest item in my Etsy shop. I totally love how this fuzzy panda hat turned out. Hope I'm not the only one!

Fuzzy Panda Bear Hat

Monday, February 4, 2013

Etsy: Mickey and Minnie Mouse Hats

Now available for sale from my Etsy shop! Order the Minnie hat in red, hot pink, baby pink, or any color you like!

Mickey Mouse
Minnie Mouse (more pictures on the listing)